Custom Search

Wednesday, June 30, 2010

How I add AdSense on my blog

  • Go to the Template > AdSense tab and sign up for AdSense, if necessary.
  • Select the size and color of your ads.
  • You'll see a preview of your blog as you make changes.
Adding AdSense to your blog is easy. Go to the Template tab in Blogger and you'll see an "AdSense ads" tab.

below it:

If you don't have an AdSense account already, you can sign up for it right here within Blogger. Just enter a valid email address, choose a password, fill in some contact information (so you can get paid!) and then Blogger will register your account for you right away.

If you do have an account already, just use the "sign in" link instead.


Once you've completed the sign-up form, or logged in to an existing account, you'll see a special preview version of your template, showing your blog as it will look with your new ads:


Using the menus above the preview, you can easily change the size, shape, and color of your ads, without ever needing to edit the code directly. The color menu has some preset color schemes, but also some flexible options that try to match, contrast, or blend with whatever template you happen to be using.


Try them all out and see which setting works best.

Once you've decided how you'd like it to look, just save the changes and republish your blog. Then go check your email.

While you were deciding on layouts and colors, you probably received a confirmation email from AdSense. Find that email and click on the link it gives you to confirm your email address. Be sure to read the rest of the confirmation email as well, since it will contain other information on finishing the registration and approval process. Until your email address is confirmed and your AdSense application is approved, your ads will only show public service announcements (PSAs) rather than targeted ads. Since you don't get revenue from PSAs, you'll want to be sure to do this soon, so the AdSense bot can crawl your site and determine appropriate ads to show.

And now you're done! Congratulations -- you've got AdSense!

Notes:
  • There may be a bit of a delay before the AdSense bot gets to your site and you start getting targeted ads, though that should happen within 48 hours. Just be patient and it will get there in time.
Thanks to Google Help Center

Tuesday, June 29, 2010

Add your Web or Blog (Blogger / Blogspot) to Google Webmaster Tool for SEO

Google Webmaster Tools are a free, robust set of reports that allows bloggers and web-masters to view detailed statistics about their site rankings. In order to get the most out of Google Webmaster Tools, it is important that you not only add, but also verify your website or blog.

Here's how to submit and verify your Blogspot / Blogger blog for Google Webmaster Tools.

Step 1:
SIGN UP FOR GOOGLE WEBMASTER TOOLS:
Using the link in Resources below, visit the Google Webmaster Tool home page. On the right-hand side, toward the bottom, click on "Create An Account Now"


Follow the instructions on screen to create your account. After you create account and logged in, return to the Google Webmaster Tool home page to sign in. 

Note: If you already have a Gmail account then don't need to create a new account. Just click on Sign in to Webmaster Tools type your Gmail id and password then click on logged in.

Step 2:
SUBMIT A BLOG / WEB AND OBTAIN VERIFICATION CODE:
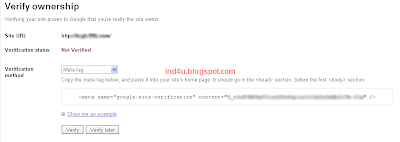
You should now be on the Google Webmaster Tools Dashboard, where you can add your Blogspot's URL. Click on Add a site button and type your complete blog or web URL. (see blow image)


then click on Continue. After you click "Coutinue" you will come to the Overview page. Google Webmaster Tools give a Meta Tag.

Example:
<meta name="google-site-verification" content="I_t6nFGasfdRdP2Layd322344230pdasf3LYh-6Ig" />


 Copy the complete meta tag code that Google generates.

Step 3:
ADD VERIFICATION CODE TO BLOG:
In a new browser window, go on Blogger Dashboard, and click on "Design" or "Layout"


Then click on "Edit HTML". In the Edit Template screen.


You will see the HTML script for your blog template. Toward the top, you will see the tag. Paste the Meta tag just below tag. If you need help, click on the image below to enlarge and view correct meta tag placement.


Save your template.

Step 4:
CONFIRM YOUR BLOG IS VERIFIED:
Return to Google Webmaster Tools, and click on the "Verify" button.


Google will confirm that it can view the meta tag that you've pasted into the Blogspot, and you will immediately be able to utilize the many tools and reports Google provided and your blog also add Google search engine.

If your need and problem do comments

How add Facebook like button on Blogger (Blogspot) and how customize it.


Few days ago, facebook surprised us by launching a lot of social plugins, one of them, actually the most popular one yet is the famous like button,  In this tutorial you’ll learn how to add it to your blogger blog and you’ll learn how to customize. Change the verb, like or recommend, change it’s color and change it’s font.

STEP 1:

Add the button code it to your template script.

  • Log into your blogger account, then go to Design >> Edit Html.
  • Then check on Expand Widget Templates box.
  • Find the Code below and paste the Facebook like button script after it.
<div class='post-header-line-1'/>
  • If you didn’t find the code above in your template, Then try to find the following and paste the Facebook like button script before it.
<data:post.body/>
  • Facebook like button script.
<b:if cond='data:blog.pageType == &quot;item&quot;'> <iframe allowTransparency='true' expr:src='&quot;http://www.facebook.com/plugins/like.php?href=&quot; + data:post.url + &quot;&amp;layout=standard&amp;show_faces=false&amp;width=100&amp;action=like&amp;font=arial&amp;colorscheme=light&quot;' frameborder='0' scrolling='no' style='border:none; overflow:hidden; width:450px; height:40px;'/> </b:if> 
  • Create your own Facebook like button script Click Here

    • click on Save Template and you are done.
    STEP 2:
    Customize your Facebook like button.


    in the above code you can customize 3 Parts. and i’ve colored them to make it easy for you to recognize, in the above code change the following parts:
    • like this part controls the verb that appear on your button, keep it as you see or change it to recommend if you want.
    • Arial this part controls the font type, keep it or change it to one of the following:
    lucida+grande
    segoe+ui
    tahoma
    trebuchet+ms
    verdana
    • Light this part controls your button color theme, and you have three options
    Light
    Evil
    Dark
    • Update, How to make it appear on your home page.
    In the button code there are two parts you’ll need to remove to make this button appear on your home page, the first line and the last line, if you still don’t under stand, please see the following parts and delete it before pasting the code to your template.
    <b:if cond='data:blog.pageType == &quot;item&quot;'>
    </b:if>
    UPDATE
    if you want facebook like button individual blog post. follow below instructions.

    Paste below script at button of
    <b:includable id='post' var='post'>. this line.

    <iframe 
    allowTransparency='true'
    frameborder='0'
    scrolling='no'
    expr:src='"http://www.facebook.com/plugins/like.php?href="
    + data:post.url
    + "&amp;layout=standard&amp;show_faces=true&amp;"
    + "width=530&amp;height=60&amp;action=like&amp;"
    + "colorscheme=light"'
    style='border:none; overflow:hidden; width:530px; height:60px'/>

    In case you have issues, here is the version with all the clarifying formatting removed and no line breaks:

    <iframe allowTransparency='true' expr:src='"http://www.facebook.com/plugins/like.php?href=" + data:post.url + "&amp;layout=standard&amp;show_faces=true&amp;width=530&amp;height=60&amp;action=like&amp;colorscheme=light"' frameborder='0' scrolling='no' style='border:none; overflow:hidden; width:530px; height:60px'/>

    Need More Help Just Ask In The Comments.

    Monday, June 28, 2010

    Google adsense secrets tips and tricks for beginners and Pro’s

    Adsense Tip 1: Find Best keywords for your content
    Before serving ads on a web page, check its keyword density. You can find many free keyword analyzer tools in internet searching the word "free keyword analyzer".
    Adsense Tip 2: Improve your keywords
    Get keyword suggestions from Google AdWords Sandbox. Get new keywords that can help you improve your ad relevance.
    Adsense Tip 3: Make content rich websites
    This means that content-rich websites of a popular topic should attract a large amount of ads.
    Adsense Tip 4: Write a new page/blog post every day
    This is very important. The more content you have, the more visitors you will get. Put an adsense unit on each and every content page of your site.
    Adsense Tip 5: Choose the right adsense format
    The top three adsense formats are for many webmasters:

    336x280 large rectangle
    300x250 medium rectangle
    160x600 wide skyscraper

    Another successful format is the 728x15 horizontal ad links, that can be placed under your navigation bar.

    Use "Allowed site" feature of adsense to protect yourselves. If anyone put adsense codes in their websites you must not worried about it.
    Adsense Tip 6: adsense Color tips
    When creating your Google adsense ads it is recommended to use the color scheme and style of your website so that the ads blend in well. Google Ads with no background color and no borders will always perform better. Make the border color and background color same as your page background color.
    Adsense Tip 7: Position tips
    Place the adsense ads in a prominent place around the top/left part of your page or under your headlines.

    For short articles, CTR is best when ads are placed just above the content.

    For long articles, CTR will improve if you place ads somewhere in middle of the content or just where the article ends.

    Use Text Ads instead of Image Ads as users get more options and the payout is often higher.

    Important: Don’t places images next to Google ads as that will invite a permanent ban to your adsense account.
    Adsense Tip 8: Increase the number of ads, but not too much
    If you have a lot of text on a page, use multiple adsense units. You can use up to three adsense units on a page, two adsense search boxes and one unit of ad links.
    Adsense Tip 9: Preview Google ads
    You can find out what ads will be served by Google adsense if you install Google adsense Preview Tool, a very simple tool available only for Internet Explorer 6.0. Click to advertiser sites without generating invalid clicks, and easily add their URLs to your URL filter list. Because adsense uses geo-targeting, Google serves different ads for other countries.
    Adsense Tip 10: What not to do with adsense
    Don't click on your own ads
    Don't ask others to click on your Google ads
    Don't manually change adsense code
    Don't place Google ads on sites that include prohibited content (e.g.: adult sites)
    Don't employ cloaking, hidden text or farm links
    Don't use adsense ads on the same page with similar ads (e.g.: Yahoo Publisher Network)
    And also don't refresh your site excessively.
    Adsense Tip 11: Use section targeting
    Use section targeting to emphasize some content in your page.To know more about section targeting read this article.
    Adsense Tip 12: Your Google ads should be visible
    Make sure your text ads are visible well to the surfers in all screen formats.
    Adsense Tip 13: Use adsense channels
    You can categorize the content of your website into channels and then track your performance. This way you can experiment with different types of ads and see which is performing the best.
    Adsense Tip 14: Follow adsense Program Polices
    Strictly follow the rules mentioned in adsense policies. You will always earn more money from adsense if you do it.
    Adsense Tip 15: Never modify the Google adsense HTML code
    If have trouble embedding adsense code in your Blogger template, read these articles.
    Adsense Tip 16: Don't place ads in pop-up windows, error pages, empty pages
    You must always remember to not to do it.
    Adsense Tip 17: Don't start a "MFA"(made for adsense) web site
    You will never make money out these Made for adsense websites. Instead, write on topics what you are passionate about. Don't waste your money and time searching on high-paying adsense keywords lists.
    Adsense Tip 18: Block Low Paying adsense Ads
    Block low paying advertisers with Filters. For more info read this article.
    Adsense Tip 19: adsense For Search
    Always select the setting to open Google adsense search box results in a new browser window, so you won't lose your visitors.

    Add recently post, recently comments and archive multi section tab to blogger (blogspot)


    To add a nice multi tab section to your blog follow the steps given below.

    1. Login to your blogger dashboard–> layout- -> Edit HTML

    2. Backup your Templates (Don't know click here)

    3. Scroll down to where you see tag .

    4. Copy below code and paste it just before the tag .

    <style type='text/css'>
    h2 { font-size:11px;}
    .tabberlive .tabbertabhide {
    display:none;
    }

    .tabber { font-size:11px;
    }
    .tabberlive {

    }

    ul.tabbernav
    {

    padding: 3px 0;
    }

    ul.tabbernav li
    {
    list-style: none;
    display: inline;
    }

    ul.tabbernav li a
    {
    padding: 3px 0.5em;
    margin-right: 3px;
    border-bottom: none;
    background: #eeedea;
    text-decoration: none;
    }

    ul.tabbernav li a:link {}
    ul.tabbernav li a:visited { }

    ul.tabbernav li a:hover
    {
    color: #000;
    background: #f8f8f4;

    }

    ul.tabbernav li.tabberactive a
    {
    background: #f8f8f4;
    }

    ul.tabbernav li.tabberactive a:hover
    {
    color: #333;
    background: #f8f8f4;

    }

    /*--------------------------------------------------
    .tabbertab = the tab content
    Add style only after the tabber interface is set up (.tabberlive)
    --------------------------------------------------*/
    .tabberlive .tabbertab {
    padding:5px;
    border-top:0;
    background:#f5f5f3;


    /* If you don&#39;t want the tab size changing whenever a tab is changed
    you can set a fixed height */

    /* height:200px; */

    /* If you set a fix height set overflow to auto and you will get a
    scrollbar when necessary */

    /* overflow:auto; */
    }

    /* If desired, hide the heading since a heading is provided by the tab */
    .tabberlive .tabbertab h2 {
    display:none;

    }
    .tabberlive .tabbertab h3 {
    display:none;

    }

    /* Example of using an ID to set different styles for the tabs on the page */
    .tabberlive#tab1 {
    }
    .tabberlive#tab2 {
    }
    .tabberlive#tab2 .tabbertab {
    height:200px;
    overflow:auto;
    }

    .tabbertab p { padding-bottom:10px; line-height:140%; }
    .tabbertab ul { padding:0; margin:0;}
    .tabbertab ul li { padding:5px 0 6px 0; font-size:11px; }
    .tabbertab ul li { background:url(https://blogger.googleusercontent.com/img/b/R29vZ2xl/AVvXsEhOn5-mTOSGainyIhcWPU0B3PyZbOw3sTS3xKQw4pWWCZjP3NQrBOXzD5wG_7zCn7lTqeyoaYn7clGKUhRePfzmqGI_0Hh6xDwtPShleUVdnIlygRQvpyRwNRIlbEpBbc5ewnJRhqXV_8F6/) no-repeat 0 7px; padding-left:16px; border-bottom:1px solid #eeedea;}
    </style>

    <script type='text/javascript'>
    //<![CDATA[

    function tabberObj(argsObj)
    {
    var arg; /* name of an argument to override */

    /* Element for the main tabber div. If you supply this in argsObj,
    then the init() method will be called.
    */
    this.div = null;

    /* Class of the main tabber div */
    this.classMain = "tabber";

    /* Rename classMain to classMainLive after tabifying
    (so a different style can be applied)
    */
    this.classMainLive = "tabberlive";

    /* Class of each DIV that contains a tab */
    this.classTab = "tabbertab";

    /* Class to indicate which tab should be active on startup */
    this.classTabDefault = "tabbertabdefault";

    /* Class for the navigation UL */
    this.classNav = "tabbernav";

    /* When a tab is to be hidden, instead of setting display='none', we
    set the class of the div to classTabHide. In your screen
    stylesheet you should set classTabHide to display:none.  In your
    print stylesheet you should set display:block to ensure that all
    the information is printed.
    */
    this.classTabHide = "tabbertabhide";

    /* Class to set the navigation LI when the tab is active, so you can
    use a different style on the active tab.
    */
    this.classNavActive = "tabberactive";

    /* Elements that might contain the title for the tab, only used if a
    title is not specified in the TITLE attribute of DIV classTab.
    */
    this.titleElements = ['h2','h3','h4','h5','h6'];

    /* Should we strip out the HTML from the innerHTML of the title elements?
    This should usually be true.
    */
    this.titleElementsStripHTML = true;

    /* If the user specified the tab names using a TITLE attribute on
    the DIV, then the browser will display a tooltip whenever the
    mouse is over the DIV. To prevent this tooltip, we can remove the
    TITLE attribute after getting the tab name.
    */
    this.removeTitle = true;

    /* If you want to add an id to each link set this to true */
    this.addLinkId = false;

    /* If addIds==true, then you can set a format for the ids.
    <tabberid> will be replaced with the id of the main tabber div.
    <tabnumberzero> will be replaced with the tab number
    (tab numbers starting at zero)
    <tabnumberone> will be replaced with the tab number
    (tab numbers starting at one)
    <tabtitle> will be replaced by the tab title
    (with all non-alphanumeric characters removed)
    */
    this.linkIdFormat = '<tabberid>nav<tabnumberone>';

    /* You can override the defaults listed above by passing in an object:
    var mytab = new tabber({property:value,property:value});
    */
    for (arg in argsObj) { this[arg] = argsObj[arg]; }

    /* Create regular expressions for the class names; Note: if you
    change the class names after a new object is created you must
    also change these regular expressions.
    */
    this.REclassMain = new RegExp('\\b' + this.classMain + '\\b', 'gi');
    this.REclassMainLive = new RegExp('\\b' + this.classMainLive + '\\b', 'gi');
    this.REclassTab = new RegExp('\\b' + this.classTab + '\\b', 'gi');
    this.REclassTabDefault = new RegExp('\\b' + this.classTabDefault + '\\b', 'gi');
    this.REclassTabHide = new RegExp('\\b' + this.classTabHide + '\\b', 'gi');

    /* Array of objects holding info about each tab */
    this.tabs = new Array();

    /* If the main tabber div was specified, call init() now */
    if (this.div) {

    this.init(this.div);

    /* We don't need the main div anymore, and to prevent a memory leak
    in IE, we must remove the circular reference between the div
    and the tabber object. */
    this.div = null;
    }
    }


    /*--------------------------------------------------
    Methods for tabberObj
    --------------------------------------------------*/


    tabberObj.prototype.init = function(e)
    {
    /* Set up the tabber interface.

    e = element (the main containing div)

    Example:
    init(document.getElementById('mytabberdiv'))
    */

    var
    childNodes, /* child nodes of the tabber div */
    i, i2, /* loop indices */
    t, /* object to store info about a single tab */
    defaultTab=0, /* which tab to select by default */
    DOM_ul, /* tabbernav list */
    DOM_li, /* tabbernav list item */
    DOM_a, /* tabbernav link */
    aId, /* A unique id for DOM_a */
    headingElement; /* searching for text to use in the tab */

    /* Verify that the browser supports DOM scripting */
    if (!document.getElementsByTagName) { return false; }

    /* If the main DIV has an ID then save it. */
    if (e.id) {
    this.id = e.id;
    }

    /* Clear the tabs array (but it should normally be empty) */
    this.tabs.length = 0;

    /* Loop through an array of all the child nodes within our tabber element. */
    childNodes = e.childNodes;
    for(i=0; i < childNodes.length; i++) {

    /* Find the nodes where class="tabbertab" */
    if(childNodes[i].className &&
    childNodes[i].className.match(this.REclassTab)) {

    /* Create a new object to save info about this tab */
    t = new Object();

    /* Save a pointer to the div for this tab */
    t.div = childNodes[i];

    /* Add the new object to the array of tabs */
    this.tabs[this.tabs.length] = t;

    /* If the class name contains classTabDefault,
    then select this tab by default.
    */
    if (childNodes[i].className.match(this.REclassTabDefault)) {
    defaultTab = this.tabs.length-1;
    }
    }
    }

    /* Create a new UL list to hold the tab headings */
    DOM_ul = document.createElement("ul");
    DOM_ul.className = this.classNav;

    /* Loop through each tab we found */
    for (i=0; i < this.tabs.length; i++) {

    t = this.tabs[i];

    /* Get the label to use for this tab:
    From the title attribute on the DIV,
    Or from one of the this.titleElements[] elements,
    Or use an automatically generated number.
    */
    t.headingText = t.div.title;

    /* Remove the title attribute to prevent a tooltip from appearing */
    if (this.removeTitle) { t.div.title = ''; }

    if (!t.headingText) {

    /* Title was not defined in the title of the DIV,
    So try to get the title from an element within the DIV.
    Go through the list of elements in this.titleElements
    (typically heading elements ['h2','h3','h4'])
    */
    for (i2=0; i2<this.titleElements.length; i2++) {
    headingElement = t.div.getElementsByTagName(this.titleElements[i2])[0];
    if (headingElement) {
    t.headingText = headingElement.innerHTML;
    if (this.titleElementsStripHTML) {
      t.headingText.replace(/<br>/gi," ");
      t.headingText = t.headingText.replace(/<[^>]+>/g,"");
    }
    break;
    }
    }
    }

    if (!t.headingText) {
    /* Title was not found (or is blank) so automatically generate a
    number for the tab.
    */
    t.headingText = i + 1;
    }

    /* Create a list element for the tab */
    DOM_li = document.createElement("li");

    /* Save a reference to this list item so we can later change it to
    the "active" class */
    t.li = DOM_li;

    /* Create a link to activate the tab */
    DOM_a = document.createElement("a");
    DOM_a.appendChild(document.createTextNode(t.headingText));
    DOM_a.href = "javascript:void(null);";
    DOM_a.title = t.headingText;
    DOM_a.onclick = this.navClick;

    /* Add some properties to the link so we can identify which tab
    was clicked. Later the navClick method will need this.
    */
    DOM_a.tabber = this;
    DOM_a.tabberIndex = i;

    /* Do we need to add an id to DOM_a? */
    if (this.addLinkId && this.linkIdFormat) {

    /* Determine the id name */
    aId = this.linkIdFormat;
    aId = aId.replace(/<tabberid>/gi, this.id);
    aId = aId.replace(/<tabnumberzero>/gi, i);
    aId = aId.replace(/<tabnumberone>/gi, i+1);
    aId = aId.replace(/<tabtitle>/gi, t.headingText.replace(/[^a-zA-Z0-9\-]/gi, ''));

    DOM_a.id = aId;
    }

    /* Add the link to the list element */
    DOM_li.appendChild(DOM_a);

    /* Add the list element to the list */
    DOM_ul.appendChild(DOM_li);
    }

    /* Add the UL list to the beginning of the tabber div */
    e.insertBefore(DOM_ul, e.firstChild);

    /* Make the tabber div "live" so different CSS can be applied */
    e.className = e.className.replace(this.REclassMain, this.classMainLive);

    /* Activate the default tab, and do not call the onclick handler */
    this.tabShow(defaultTab);

    /* If the user specified an onLoad function, call it now. */
    if (typeof this.onLoad == 'function') {
    this.onLoad({tabber:this});
    }

    return this;
    };


    tabberObj.prototype.navClick = function(event)
    {
    /* This method should only be called by the onClick event of an <A>
    element, in which case we will determine which tab was clicked by
    examining a property that we previously attached to the <A>
    element.

    Since this was triggered from an onClick event, the variable
    "this" refers to the <A> element that triggered the onClick
    event (and not to the tabberObj).

    When tabberObj was initialized, we added some extra properties
    to the <A> element, for the purpose of retrieving them now. Get
    the tabberObj object, plus the tab number that was clicked.
    */

    var
    rVal, /* Return value from the user onclick function */
    a, /* element that triggered the onclick event */
    self, /* the tabber object */
    tabberIndex, /* index of the tab that triggered the event */
    onClickArgs; /* args to send the onclick function */

    a = this;
    if (!a.tabber) { return false; }

    self = a.tabber;
    tabberIndex = a.tabberIndex;

    /* Remove focus from the link because it looks ugly.
    I don't know if this is a good idea...
    */
    a.blur();

    /* If the user specified an onClick function, call it now.
    If the function returns false then do not continue.
    */
    if (typeof self.onClick == 'function') {

    onClickArgs = {'tabber':self, 'index':tabberIndex, 'event':event};

    /* IE uses a different way to access the event object */
    if (!event) { onClickArgs.event = window.event; }

    rVal = self.onClick(onClickArgs);
    if (rVal === false) { return false; }
    }

    self.tabShow(tabberIndex);

    return false;
    };


    tabberObj.prototype.tabHideAll = function()
    {
    var i; /* counter */

    /* Hide all tabs and make all navigation links inactive */
    for (i = 0; i < this.tabs.length; i++) {
    this.tabHide(i);
    }
    };


    tabberObj.prototype.tabHide = function(tabberIndex)
    {
    var div;

    if (!this.tabs[tabberIndex]) { return false; }

    /* Hide a single tab and make its navigation link inactive */
    div = this.tabs[tabberIndex].div;

    /* Hide the tab contents by adding classTabHide to the div */
    if (!div.className.match(this.REclassTabHide)) {
    div.className += ' ' + this.classTabHide;
    }
    this.navClearActive(tabberIndex);

    return this;
    };


    tabberObj.prototype.tabShow = function(tabberIndex)
    {
    /* Show the tabberIndex tab and hide all the other tabs */

    var div;

    if (!this.tabs[tabberIndex]) { return false; }

    /* Hide all the tabs first */
    this.tabHideAll();

    /* Get the div that holds this tab */
    div = this.tabs[tabberIndex].div;

    /* Remove classTabHide from the div */
    div.className = div.className.replace(this.REclassTabHide, '');

    /* Mark this tab navigation link as "active" */
    this.navSetActive(tabberIndex);

    /* If the user specified an onTabDisplay function, call it now. */
    if (typeof this.onTabDisplay == 'function') {
    this.onTabDisplay({'tabber':this, 'index':tabberIndex});
    }

    return this;
    };

    tabberObj.prototype.navSetActive = function(tabberIndex)
    {
    /* Note: this method does *not* enforce the rule
    that only one nav item can be active at a time.
    */

    /* Set classNavActive for the navigation list item */
    this.tabs[tabberIndex].li.className = this.classNavActive;

    return this;
    };


    tabberObj.prototype.navClearActive = function(tabberIndex)
    {
    /* Note: this method does *not* enforce the rule
    that one nav should always be active.
    */

    /* Remove classNavActive from the navigation list item */
    this.tabs[tabberIndex].li.className = '';

    return this;
    };


    /*==================================================*/


    function tabberAutomatic(tabberArgs)
    {
    /* This function finds all DIV elements in the document where
    class=tabber.classMain, then converts them to use the tabber
    interface.

    tabberArgs = an object to send to "new tabber()"
    */
    var
    tempObj, /* Temporary tabber object */
    divs, /* Array of all divs on the page */
    i; /* Loop index */

    if (!tabberArgs) { tabberArgs = {}; }

    /* Create a tabber object so we can get the value of classMain */
    tempObj = new tabberObj(tabberArgs);

    /* Find all DIV elements in the document that have class=tabber */

    /* First get an array of all DIV elements and loop through them */
    divs = document.getElementsByTagName("div");
    for (i=0; i < divs.length; i++) {

    /* Is this DIV the correct class? */
    if (divs[i].className &&
    divs[i].className.match(tempObj.REclassMain)) {

    /* Now tabify the DIV */
    tabberArgs.div = divs[i];
    divs[i].tabber = new tabberObj(tabberArgs);
    }
    }

    return this;
    }


    /*==================================================*/


    function tabberAutomaticOnLoad(tabberArgs)
    {
    /* This function adds tabberAutomatic to the window.onload event,
    so it will run after the document has finished loading.
    */
    var oldOnLoad;

    if (!tabberArgs) { tabberArgs = {}; }

    oldOnLoad = window.onload;
    if (typeof window.onload != 'function') {
    window.onload = function() {
    tabberAutomatic(tabberArgs);
    };
    } else {
    window.onload = function() {
    oldOnLoad();
    tabberAutomatic(tabberArgs);
    };
    }
    }


    /*==================================================*/


    /* Run tabberAutomaticOnload() unless the "manualStartup" option was specified */

    if (typeof tabberOptions == 'undefined') {

    tabberAutomaticOnLoad();

    } else {

    if (!tabberOptions['manualStartup']) {
    tabberAutomaticOnLoad(tabberOptions);
    }

    }

    //]]>
    </script>

    Note : Host bullet.gif image yourself.


    4. Now go to Design-->Page Element and click on "Add a gadget".

    5. Select "html/java script" and add the code given below and click save.

    <div id="tab">
    <div class="tabber">

    <div class="tabbertab">
    <h2>Recent Post</h2>
    <ul>

    ENTER-TAB-1-CONTENT

    </ul>
    </div>

    <div class="tabbertab">
    <h2>Recent Comments</h2>

    <ul>

    ENTER-TAB-2-CONTENT

    </ul>
    </div>

    <div class="tabbertab">
    <h2>Archives</h2>
    <ul>

    ENTER-TAB-3-CONTENT

    </ul>
    </div>

    </div></div>


    Note: Replace ENTER-TAB-1-CONTENT , ENTER-TAB-2-CONTENT , ENTER-TAB-3-CONTENT with your content.

    And also you can change Tabs Names.(Blue colored text in script).

    Please do comments and share if any problem.

    Saturday, June 26, 2010

    Make backup of blogger (blogspot) template?

    To take backup of your blogger blog or blogspot.com blog template follow these instruction carefully.

    Login in to your blogger account www.blogger.com


    Select your desired blog to take template back up.

    Click on Design > Edit HTML


     and then click on ‘download full template’ to save it on your computer. (See the Image Below)

    How to make a huge content wealthy blog on blogger (blogspot)?

    Most people ask me how I made a blog from scratch such as Ind4u.blogspot? What it takes to be a pro blogger and how I managed to write so much interesting content? Now this is a question which doesn’t have a simple answer and I can’t give you the right tip to build your big blog next week! It’s a sort of thing that takes time and effort.


    When I first started Ind4u, I never thought I would write so many contents on it. I had another blog that I had to focus completely on that. I had 15-20 post ideas for Ind4u and after that I would close the blog. But soon people started to read my new blog and I had to close my first blog and put the spotlight on Ind4u.


    Blogging is like digging!

    Here I mean by dig, not the social bookmarking site digg. When you start digging a hole, you had a plan what it would be? Some wants to plant a tree, some wants to make a moat and some of them will tell you are building a canal. When you tell your friends that you’re building a cannel, and they quickly appears on your place to find out it’s just a 2 feet deep hole in your backyard; it just turns them away!

    Most people who desperately wants to make money with it will fill up the 2 feet hole into water and put fishes (ads) and place a board next to it “it’s a money making blog!” They will even create 10’s of holes in their backyard and do the same thing.

    When you decide you are going to do this, you should start digging and should do it regularly.. within few months it will become a huge in size.
    It takes less effort if you’re doing it regularly

    Most people spend a whole lot of time into their blogs, writing, promoting and then tracking their visitors.. in the first few weeks of your blog it’s natural but on the upcoming months you should provide a continuous effort to it. If you decide to publish 3 posts a week, then try to stick with that.

    It’s so much easy like this math: if you write one post each day, you will be producing an average of 250-300 articles a year. That means on the next year your blog will have 300 posts and they will generate search engine traffic. When a new visitor will land on your blog, they will have enough content to spend his next 2-3 months discovering and reading them. They will also share the content with their friends and more traffic will be generated. On the second year, you will be having another 300 articles and that means double the exposure.

    In this time the first set of 300 articles will generate you the most search traffic because they have already developed a good search rankings.

    The journey is different for each blogger

    You will be surprised to hear that a lot of bloggers who started blogging after you started blogging, are making a good income and getting tons of traffic! That’s not all, there must be a lot of bloggers who started blogging last month but made a large list of visitors. This is a thing when most bloggers feels they are not doing it right or it’s not going to work.

    Some people learn fast and some people gets the right information in the right time. Please don’t get upset if another new blogger is acheiving something before you did. It doesn’t matters what you did in short time, it matters what impact you put in the long term. In the end, the one who survived is the winner. In some niches 200 RSS readers are much more valuable than 10,000 RSS readers in another niche. It depends on how you see your blog and this is the way others will see it too.

    How to Post HTML or Java script and source codes on blogger (blogspot)

    If you’re a blogspot platform blogger and want to show HTML source codes in your blog posts then you must had a hard time how to make it done. You can see that I’ve created special boxes for those HTML codes and the code remains intact inside the post. It’s a nice trick for blogger platform if you’re willing to post tutorials and badges for your readers.

    For this you have to take two simple steps


    Step 1

    You have to add a special code inside your blogger template. Go to your blogger Dashboard > Layout > Edit HTML.


    Now hit CTRL+F or CTRL+D on your keyboard and search this tag

    ]]></b:skin>

    Now you have to add this code above that code, pre

    {
    background:#efefef;
    border:1px solid #A6B0BF;
    font-size:120%;
    line-height:100%;
    overflow:auto;
    padding:10px;
    color:#000000 }
    pre:hover {
    border:1px solid #efefef;
    }
    code {
    font-size:120%;
    text-align:left;
    margin:0;padding:0;
    color: #000000;}
    .clear { clear:both;
    overflow:hidden;
    }
    Now it will look something like this,


    After you done it, click the “Preview” button to see if your blog shows or not. If everything’s okay, then click, "Save template"

    Step 2

    Now each time you create a post and you need to add some HTML codes inside your post, you have to convert it into escapable characters. For this go to this tool called Quik escape and insert your code. Click, “Convert to escaped character” the converted code will be different than the original.

    Now create a new blog post and add the converted code. You have to enclosed the code with a “pre” tag(marked as blue) For this I’ve added the same code twice. One normally and the other one with the hack.


    Publish your post and see the magic! The normal code showed up with the effect but the hacked on remained intact inside the table.


    Please leave a comment with your response and any suggestion for this blogger hack. If you run into any trouble, feel free to ask me a question. Please do share/save this page if it helped you.